CLICK HERE FOR FREE BLOG LAYOUTS, LINK BUTTONS AND MORE! »

Friday, March 25, 2011

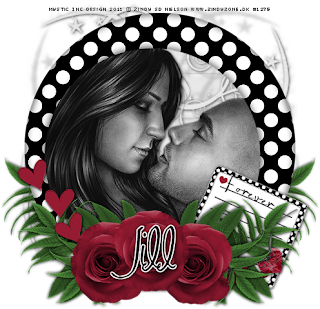
Forever Kind of Love


Artwork by Zindy SD Nielson and you can find her here. Please make sure that you have the appropriate artist license to use the same tube as I do.

Supplies Needed:

Tube or image of choice
Scrap Kit: "Crazy Kind of Love" by Created by Jill Scraps, a list of stores that sell her product are on her blog here.
Mask(s): Your choice, mine was #433 by Vix.
Font(s): AL Charisma & MA Sexy

Here we go!

Open new image, 500x500, flood fill background with white.

Copy and paste frame 4, re size as necessary, using magic wand, select inside of frame, expand by 5, flood fill with paper 01.

Copy and paste paper 01 as a new layer, move on top of paper fill for frame, apply mask.

Copy and paste any other elements that you would like to use, resizing and rotating as you go. Make sure you layer the leaves so some are underneath the frame.

Copy and paste the tube of your choice, re size to fit into frame, duplicate, mirror image for other side.

At this point, I usually re size if I need a smaller image. I also save both the original size and the smaller size images.

Add a new vector layer for your text - (I flood filled mine with black) To make it stand out, duplicate the layer, convert bottom layer to raster, expand by 2, flood fill with white.

Go back through to sharpen and add a drop shadow to your layers.

Add your copyright as the finishing touch.

Save your tag in your favorite format and you are done!!

This tutorial was written by Debbie (Mystic Inc Design), 2011. Any resemblance to any other tutorial is purely coincidental and not intended.

It's a Crazy Thing


Artwork by Zindy SD Nielson and you can find her here. Please make sure that you have the appropriate artist license to use the same tube as I do.

Supplies Needed:

Tube or image of choice
Scrap Kit: "Crazy Kind of Love" by Created by Jill Scraps, a list of stores that sell her product are on her blog here.
Mask(s): Your choice, mine was by Vix, but I don't know which one.
Font(s): AL Charisma

Here we go!

Open new image, 500x500, floodfill background with white.

Copy and paste frame 3, rotate 90ยบ, resize as necessary, using magic wand, select inside of frame, expand by 5, flood fill with paper 01.

Copy and paste any other elements that you would like to use, resizing and rotating as you go.

Copy and paste the tube of your choice, resize to fit into frame, duplicate, mirror image for other side.

At this point, I usually resize if I need a smaller image. I also save both the original size and the smaller size images.

Add a new vector layer for your text - (I floodfilled mine with black) I lowered the opacity so it would blend better.

Go back through to sharpen and add a drop shadow to your layers.

Add your copyright as the finishing touch.

Save your tag in your favorite format and you are done!!

This tutorial was written by Debbie (Mystic Inc Design), 2011. Any resemblance to any other tutorial is purely coincidental and not intended.

Saturday, March 19, 2011

Burst of Spring


Artwork by Keith Garvey and he is a pay to use artist, you can currently find him here. Please make sure that you have the appropriate My PSP Tubes or PSP Tubes Emporium artist license to use the same tube as I do.

Supplies Needed:

Tube or image of choice
Scrap Kit: "Burst of Spring" by Created by Jill Scraps, a list of stores that sell her product are on her blog here.
Font(s): Precious

Here we go!

Open new image, 500x500, floodfill background with white.

Copy and paste frame 5, resize as necessary, using magic wand, select inside of frame, expand by 5, flood fill with paper 01, add a new layer, floodfill with paper 11, move both layers underneath frame. Lower opacity of the top layer.

Copy and paste doodle 1, resize, move underneath frame layer, duplicate, move on top of frame layer.

Copy and paste any other elements that you would like to use, resizing and rotating as you go.

Copy and paste the tube of your choice, duplicate, change blend mode to overlay, lower opacity to 75, apply gaussian blur of 3.

At this point, I usually resize if I need a smaller image. I also save both the original size and the smaller size images.

Add a new vector layer for your text - (I floodfilled mine with black) To make it stand out, duplicate the layer, convert bottom layer to raster, expand by 2, flood fill with white.

Go back through to sharpen and add a drop shadow to your layers.

Add your copyright as the finishing touch.

Save your tag in your favorite format and you are done!!

This tutorial was written by Debbie (Mystic Inc Design), 2011. Any resemblance to any other tutorial is purely coincidental and not intended.
Related Posts Plugin for WordPress, Blogger...