CLICK HERE FOR FREE BLOG LAYOUTS, LINK BUTTONS AND MORE! »

Saturday, September 5, 2009

Spell Gone Wrong


This tutorial was written for those that have a working knowledge of PSP (I use Version 9).

Supplies Needed:

Tube or image of choice: I used the cat supplied in kit
Scrapkit: "Eye of Newt" by Cora's Creations and can be purchased here.
Mask(s): Boundless Bliss grunge1, you can find it here.
Font(s): The King and Queen

Here we go!

Open a new image, 600x600 (we can resize later), flood fill with white.

Open frame3 - Copy, paste as a new layer, resize if necessary.

Open paper6 - Copy, paste as a new layer, apply mask, merge down, resize to fit frame.

Open paper10 - Copy, paste as a new layer, resize to if necessary, erase anything outside of frame, move underneath frame layer.

Open tube or image of choice - Copy, paste tube as new layer, make any resizing now.

Open assortment of elements - Copy, paste each as a new layer, resizing and rotating to your liking.

At this point, I usually resize if I need a smaller image. I also save both the original size and the smaller size images.

Add a new vector layer for your name - (I floodfilled mine with paper17) To make it stand out, use could use either Eye Candy or duplicate the layer, convert bottom layer to raster, select all, use magic wand to select text, expand by 2, floodfill with white.

Go back through to sharpen and add a drop shadow to your layers.

Add your copyright as the finishing touch.

Save your tag in your favorite format and you are done!!

This tutorial was written by Debbie (Mystic Inc Design), 2009. Any resemblance to any other tutorial is purely coincidental and not intended.
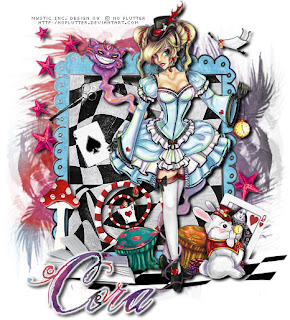
Alice's Dreamland


This tutorial was written for those that have a working knowledge of PSP (I use Version 9).

Artwork courtesy of No Flutter and she can be found here.

Supplies Needed:

Tube or image of choice
Scrapkit: "Other Side of Wonderland" by Cora's Creations and can be purchased here.
Mask(s): Weescotslass Mask 59, you can find it here.
Font(s): The King and Queen

Here we go!

Open a new image, 600x600 (we can resize later), flood fill with white.

Open frame4 - Copy, paste as a new layer, resize if necessary.

Open paper11 - Copy, paste as a new layer, apply WSL59 mask, merge down, resize to fit frame.

Open paper12 - Select inside of frame with magic wand, expand by 5, add new layer, floodfill with paper12, select none, move underneath frame layer.

Open tube or image of choice - Copy, paste tube as new layer, make any resizing now.

Open assortment of elements - Copy, paste each as a new layer, resizing and rotating to your liking.

At this point, I usually resize if I need a smaller image. I also save both the original size and the smaller size images.

Add a new vector layer for your name - (I floodfilled mine with paper11) To make it stand out, use could use either Eye Candy or duplicate the layer, convert bottom layer to raster, select all, use magic wand to select text, expand by 2, floodfill with white.

Go back through to sharpen and add a drop shadow (I used V2, H4, Opac100, Blur6, Color Black) to your layers.

Add your copyright as the finishing touch.

Save your tag in your favorite format and you are done!!

This tutorial was written by Debbie (Mystic Inc Design), 2009. Any resemblance to any other tutorial is purely coincidental and not intended.
Related Posts Plugin for WordPress, Blogger...